Posts

Upload file to SharePoint using MS Flow endpoint

Image
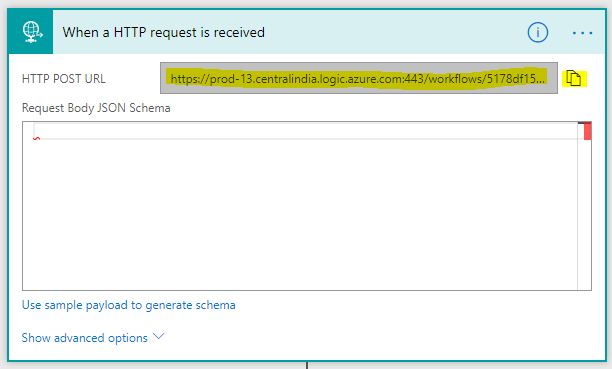
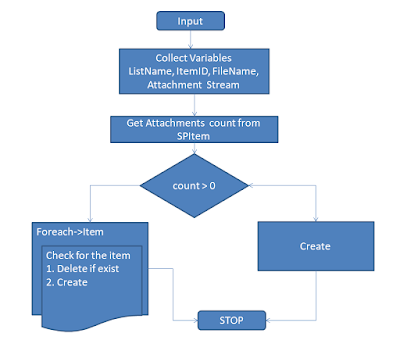
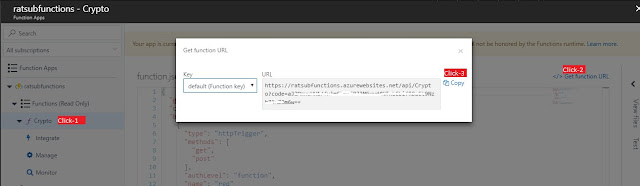
In my previous article we saw  how to Upload attachment to SharePoint list item using Microsoft Flow , as  a continuation will upload attachment using JavaScript(ajax) with MSFlow endpoint. First, Open your flow and copy the endpoint url from 'HTTP request trigger'. Append listname & itemid  in the URL Finally, Test it Detailed steps Trigger MSFlow to upload document using ajax Check out previous  series  for reference.  I recommend reading the  PowerApps scratch development series ,  Azure Function integration with PowerApps  and  What is Microsoft Flow . -Ratsub

Create Text Analysis Microsoft Cognitive service API in Azure

Image
"Text Analysis" is one of the Microsoft Cognitive Services offering on Azure. Here will see how to create "Text Analysis" services. First, Login in to https://portal.azure.com  and search for Cognitive Services Click "Create cognitive services" and search for "Text Analytics API" Fill the details as below Your endpoint and keys are ready  In upcoming articles will see how to use this on different use cases. -Ratsub

Upload attachment to SharePoint list item using Microsoft Flow

Image
Microsoft Flow is one of the Microsoft offerings for automation. In this series will see how to upload a file to SharePoint ListItem using MSFlow Workflow for our scenario Login to Microsoft Flow site  and log in to create a new flow. Add action and Type 'Data Operations' connector. Then choose 'Data operations - Compose' action Select 'Expression' tab and enter the following to create 'ListName' variable Repeat this process for all other variables  ListName - SharePoint list name. ItemID     - SPList item ID. AttachmentContent - Actual attachment content. FileName - Attchment name. Expressions: we can read values from Query String will discuss how to pass them next article. ListName: trigger() [ 'outputs' ][ 'queries' ][ 'listname' ] ItemID: trigger() [ 'outputs' ][ 'queries' ][ 'itemid' ] At

Angular 5 continues deployment to Azure App services using GitHub

Image
In today Agile tech industry clients want zero downtime and quick turn around time from dev to prod, with more these process integration like continues development to continues deployment and so on.. (other DevOps process). With these process automation, each team Dev/Testing/QA/Admin all can perform their role easily and independently without any flow caveat till deployment and finally customer is happy ๐Ÿ˜Š Microsoft Azure has this capability in-build without and additional cost and it supports multiple cloud supported repos. out of which GitHub is also supporting this integration which is widely used by the opensource community. Steps for Angular 5 continues deployment using GitHub On the high-level, we need perform below steps ng build --prod --aot install kudu support update .cmd file using kudo script Commit to GitHub branch. Done! Check the portal. What is --AOT angular 5 The Angular Ahead-of-Time (AOT) compiler converts your Angular HTML and TypeScript code i

Create and configure custom connectors for PowerApps and MSFlow from AzureFunctions

Image
I have already discussed How to Create, Configure and Deploy AzureFunction using VisualStudio  and how to create swagger(OpenApi) endpoint for AzureFunctions .  So, In this article will see how to import and use them in PowerApps & MSFlow .  Upon completion of yaml  definition creation, Click->Export to PowerApps + Flow button or copy the API definition URL. Alternatively you can also download  ApiDef.json file. Go to  https://web.powerapps.com  and authenticate then select 'Custom Connectors' from the left navigation. Then Click Create custom connector->Import an OpenApi from URL as mentioed below. Enter function secret code which we copied earlier, Then name the connector and click Contiue. Now, Fill values in each wizard General -> Upload/configure connector icon. Security -> In my scenario I used 'Function' scope access. configure it as appropriate. Definition ->  Ensure you have the proper parameter

Create swagger api endpoint for Azure functions

Image
In my previous article , we saw detailed step on how to create a server-less function using Azure Function . If you are not familiar with Azure Function topic I highly recommend you to have a look before we proceed here. Alright, In this article will see how to create/configure OpenApi for our Crypto Function and to be able to use in other applications. Before proceeding there let us understand OpenApi protocol. What is OpenApi? An open API (often referred to as a public API) is a publicly available application programming interface that provides developers with programmatic access to a proprietary software application or web service. APIs are sets of requirements that govern how one application can communicate and interact with another. - Wikipedia Basically, OpenApi provides its consumers a rich set of functionalities in a single EndPoint and to be able to access from any ecosystem.These Api are public or private based on the use-case. Like I mentioned already Crypto Azure

Setting up Angular 5 environment

Image
Check Node & NPM version Verify that you are running at least node 6.9.x and npm 3.x.x by running node -v and npm -v in a terminal/console window Install angular CLI Enter below command to install angular cli npm install -g @angular/cli How to use NPM commands behind the PROXY ๐Ÿ›  Step to access to use npm commands behind the PROXY ๐Ÿ›  Set SSL false by executing this command: npm set strict-ssl false npm config set registry http://registry.npmjs.org/ Then, Get any one of the below: 1. User-specific -  username : password @proxy.example.com:1431 (User Proxy) 2. Proxy: 129.***.**.**:** (Proxy address with port#) Now, set appropriate by executing below npm  commands: npm config set http http://username:password@proxy.example.com:1431 npm config set https-proxy https://username:password@proxy.example.com:1431 (or) npm config set http_proxy 129.***.**.**:** npm config set https_proxy 129.***.**.**:** Now, all set from an envir