

Modern page provisioning using page template
In this article let's see how to dynamically provision a modern page based on a modern page template and update its webpart properties using pnp/js in SPFx React webpart.
Create a modern page template
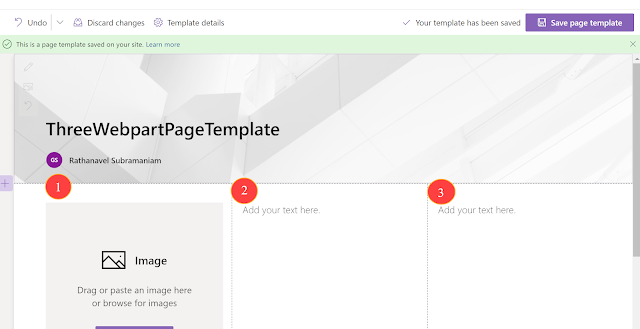
Create a page and add the webpart as per your requirements, finally save it as a template. it will be stored under the "Templates" folder in SitePages.
In the below example I have as Section=>3 Colum layout=>3 webparts.
Create a page provision form component
public render(): React.ReactElement<IDynamicPageCreaterProps> {
let thisHandler = this;
return (
<div>
<h1>{this.props.webpartName}</h1>
{
(this.props.selectedTemplate != undefined) ?
<h4><i>Selected Template- {this.props.selectedTemplate.text}</i></h4> :
<h4>Selcte Template in webapart property</h4>
}
<div>
<TextField id="txtPageName" label="Page Name" onChanged={(val) => {
this.setState({ pageName: val })
}} />
<TextField label="Page Title" onChanged={(val) => {
this.setState({ pageTitle: val })
}} />
<br />
<PrimaryButton text="Create Page" onClick={() => this.CreatePage()} />
</div>
</div>
);
}
Which looks like the below and waiting for user input.

Provision modern page based on the template
Using pnp/js we have to load the template relative URL(in my case I am reading ti from webpart property), then using the copy method from pnp/js to create a page by providing name, title from my "state" variables.
//Load Template
const page = sp.web.loadClientsidePage(this.props.selectedTemplate.key);
page.then((pageResponse) => {
//Create page based on the template
let pageVar = pageResponse.copy(sp.web, this.state.pageName, this.state.pageTitle, false);
....
....
Scan newly created page for webparts & Update webpart properties
Since we structured this page template we know the available webparts. So, we can target them individually and apply their appropriate webpart properties.
In code, we need to scan it in the below order:
|-Sections
|--Section
|---Columns
|----Column
|-----Control(s)
pageVar.then(async (_page) => {
_page.sections.forEach(section => {
section.columns.forEach(column => {
column.controls.forEach(control => {
switch (control.id) {
//Left Image webpart
case "7892e87e-832f-4255-9078-b45db861cc8c": {
let prop = {
imageSource: "https://xxx.sharepoint.com/sites/Development/Shared%20Documents/photo-1615607905884-366831fc787f.jfif",
altText: "Sample Image alttext",
overlayText: "Sample Overlay text",
"imgWidth": "200",
"imgHeight": "300",
"alignment": "Center"
}
// all-props
// "imageSourceType": 0,
// "imageSource": "",
// "captionText": "",
// "altText": "",
// "linkUrl": "",
// "overlayText": "",
// "fileName": "",
// "siteId": "",
// "webId": "",
// "listId": "",
// "uniqueId": "",
// "imgWidth": "",
// "imgHeight": "",
// "alignment": "Center"
//Update properties with custom values
control.setProperties(prop);
break;
}
//Middle Text editor webpart
case "a875946b-bf76-47e3-afc3-1c296f1b9a12": {
control.data.innerHTML = "this is dynamic content 1";
break;
}
//Right Text editor webpart
case "dd643bdf-6924-4a46-b86f-3cf409ecfc8c": {
control.data.innerHTML = "this is dynamic content 2";
break;
}
}
//Save the page with updated properties.
_page.save();
});
});
});
});
Final Output


Nice solution, can this also be used for SharePoint 2019 (on-premises)?
ReplyDelete